Home > Techtalk > Engelstalig > Cables Light
Cables Light
Disclaimer: In no way are we responsible for damage caused by following our cabling advice. When in doubt, always check, measure and/or get informed.
Whatever you do...... always make sure the ground (earth) is connected. This is the only way you can work reasonably safe. Life is short enough as it is..
Wiring scheme Bulgin connector:
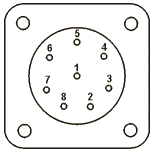 |
1. Ground 2. Chan. 1 3. Chan. 2 4. Chan. 3 5. Chan. 4 |
6. NC (Not Connected) 7. Return (Ch1, Ch2) 8. Return (Ch3, Ch4) |
Unfortunately not everybody abides these rules. There are some manufacturers that flipped the sequence of 2...5 (Ch4...Ch1 instead of Ch1...Ch4). Besides that there are also some manufacturers that connect 7 and 8 with each other. Reason for this confusion is the fact that there is no real standard for this type of plug. Fortunately enough there is ONE thing all manufacturers agree on, and that's the use of the ground connection. All manufacturers. use Pin-1 for that. This connector is used for connecting 4 channels with a per 2 channel return (Neutral). Correct wiring allows for two phase connection. REMARK: This connector is NOT approved by VDE or TUV. Neither does it have a CE marking. This connector offers a low cost alternative to the Wieland/Harting/Ilme multi connectors. Reliability is reasonable but it CAN fail under heavy duty circumstances.
Wiring scheme Wieland/Harting 6 connector:
 |
1. Chan. 1 2. Chan. 2 3. Chan. 3 4. Chan. 4 |
5. Return (Ch1, Ch2) 6. Return (Ch3, Ch4) |
With this connector there also isn't a standard (for lighting, the use of a 6 pin Wieland/Harting is non standard anyway). The 6 pin connector was originally meant to connect 3-phase electro motors (for which there IS a standard BTW). Many rental companies (including ourselves) "abuse" this connector to wire smaller 4 channel setups. The above mentioned wiring scheme is applicable to such a setup. This connector is used to wire 4 channels with a return per group of two channels (Null or Neutral). When using the correct wiring, one can even use a 2-phase setup. The strip at the end of the connector provides the Earth (PE) connection.
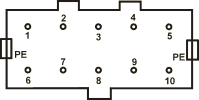
Wiring scheme Wieland/Harting 10 connector:
 |
Smaller rental companies: | |
| 1. Chan. 1 2. Chan. 2 3. Chan. 3 4. Chan. 4 5. Chan. 5 |
6. Return 1 7. Return 2 8. Return 3 9. Return 4 10. Return 5 |
|
 |
Flashlight/NOB standard: | |
| 1. Chan. 1 3. Chan. 2 5. Chan. 3 7. Chan. 4 9. Chan. 5 |
2. Return 1 4. Return 2 6. Return 3 8. Return 4 10. Return 5 |
|
This is a type of connector where most rentals agree with one and other. If you abide the above wiring scheme, there's a big chance that your system is compatible with that of other rental companies. Of course exceptions exist here also. Every now and then we see the 10 pin connector being "abused" for connecting a 6 channel system (using 3 returns; one for each phase and one spare, often used for continuous voltage) and sometimes we even see an 8 channel wiring scheme (using 2 returns). If the wiring is done as mentioned above, the result is a 5 channel system with separate returns per phase. Channel 5 is often used for continuous voltage (but could be used for whatever purpose the user has in store for it). The strip at the end of the connector provides the Earth (PE) connection.
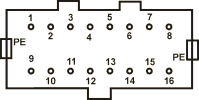
Wiring scheme Wieland/Harting 16 connector:
| Smaller rental companies: | 1. Chan. 1 2. Chan. 2 3. Chan. 3 4. Chan. 4 5. Chan. 5 6. Chan. 6 7. Chan. 7 8. Chan. 8 |
9. Return 1 10. Return 2 11. Return 3 12. Return 4 13. Return 5 14. Return 6 15. Return 7 16. Return 8 |
 |
||
| Flashlight/NOB standard: | 1. Chan. 1 3. Chan. 2 5. Chan. 3 7. Chan. 4 9. Chan. 5 11. Chan. 6 13. Chan. 7 15. Chan. 8 |
2. Return 1 4. Return 2 6. Return 3 8. Return 4 10. Return 5 12. Return 6 14. Return 7 16. Return 8 |
 |
This is a type of connector where most rentals agree with one and other. If you abide the above wiring scheme, there's a big chance that your system is compatible with that of other rental companies. Of course exceptions exist here too, though we haven't met one yet. If the wiring is done as mentioned above, the result is a 8 channel system with separate returns per phase. Channels 7 and 8 are often used for continuous voltage (but could be used for whatever purpose the user has in store for it). The strip at the end of the connector provides the Earth (PE) connection.
Wiring of low voltage Connectors:
Wiring of DMX Connectors:
This is an area where NOBODY agrees with one another. Various types of plugs are being used here (Sub-D 9, Sub-D 15, Sub-D 25, Din 8 pole, XLR-5 pole and Socapex 37). Best would be to ask the manufacturer for advice. Often the wiring scheme is printed somewhere on the device in question.
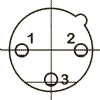 |
1. Signal Ground 2. DMX Negative 3. DMX Positive |
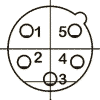 |
1. Signal Ground 2. DMX Negative 3. DMX Positive 4. SPARE 5. SPARE |
Officially (according to the DMX spec.) only 5-pole XLR connectors should be used to cary DMX signals. In real life however we also see a lot of devices using the 3-pole XLR connector. DMX cabling must have an 110 Ohm characteristic impedance, especially important for longer wire runs. For short runs, one can often get away with using regular microphone cable. IF you get erroneous responses from the dimmer racks then first check the type of cable used.
There are various uses for the "extra" pins, Pin-4 and Pin-5. Some devices use it for remote configuration, others use it for an extra DMX feed. Most simple installations don't even have Pin-4 and Pin-5 connected and thus do nothing with any information going over it.
Some manufacturers don't fully abide the DMX standard. Most Martin devices (those that accept Martin RS-485 protocol) need to have the Pin-2 and Pin-3 wiring reversed before they can be controlled with a DMX signal. When in doubt, always check the manual of the device in question.
The end of the DMX feed needs to be terminated. This must be done with a resistor which has an impedance close to the characteristic impedance of the cable in question (to avoid reflections). One would think this would mean the use of a 110 Ohm resistor (since most DMX cables have a characteristic impedance of 110 Ohm). The RS-485 specification (the one DMX is electrically based on) however states the use of an 120 Ohm resistor. Both will do just fine BTW. Instead of using a single 120 (or 110) Ohm resistor, one can make a terminator with a LED in it, showing DMX activity (handy sometimes isn't it?). Below is the simple schematic of such a device.
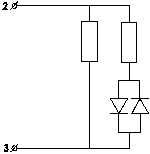 |
This schematic consists of a multicolor (2-pin) led and 2 x 220 Ohm resistors (1/4W or greater). The device doesn't say much about the DMX chain BUT it says more than no LED at all! It all fits quite nicely into a Male XLR connector. |
Unfortunately we are not allowed (by theU.S.I.T.T.) to have a copy of the DMX specifications On-Line.